FileBrowser Access
High-level guide to publishing FileBrowser with Cloudflare Tunnel and securing access with Cloudflare Zero Trust and Google login.
This guide provides a high-level, implementer-friendly overview of exposing FileBrowser through Cloudflare Tunnel and protecting it with Cloudflare Access (Zero Trust) using Google as an identity provider. It explains the why, the key concepts, recommended minimal flow, security checklist, and where to find official implementation references. This document is intentionally high-level with official cloudflare references for configurations.
Why use Cloudflare Tunnel instead of port forwarding#
Traditional remote access to homelab services typically relies on router port forwarding, which exposes a service directly to the internet. This approach increases the attack surface because the service becomes publicly reachable.
Cloudflare Tunnel works differently. The cloudflared daemon creates an outbound connection from your host to Cloudflare’s edge, which means:
- No inbound ports need to be opened on your router.
- Your public IP address remains hidden.
- Traffic reaches your service only through Cloudflare’s network.
- Additional protections such as Cloudflare Access authentication can be enforced before requests reach the origin.
This model significantly reduces direct exposure of homelab services compared to traditional port forwarding.
Architecture#
Local FileBrowser → cloudflared (outbound tunnel) → Cloudflare network → Cloudflare Access (Login / Policy) → Browser (user)
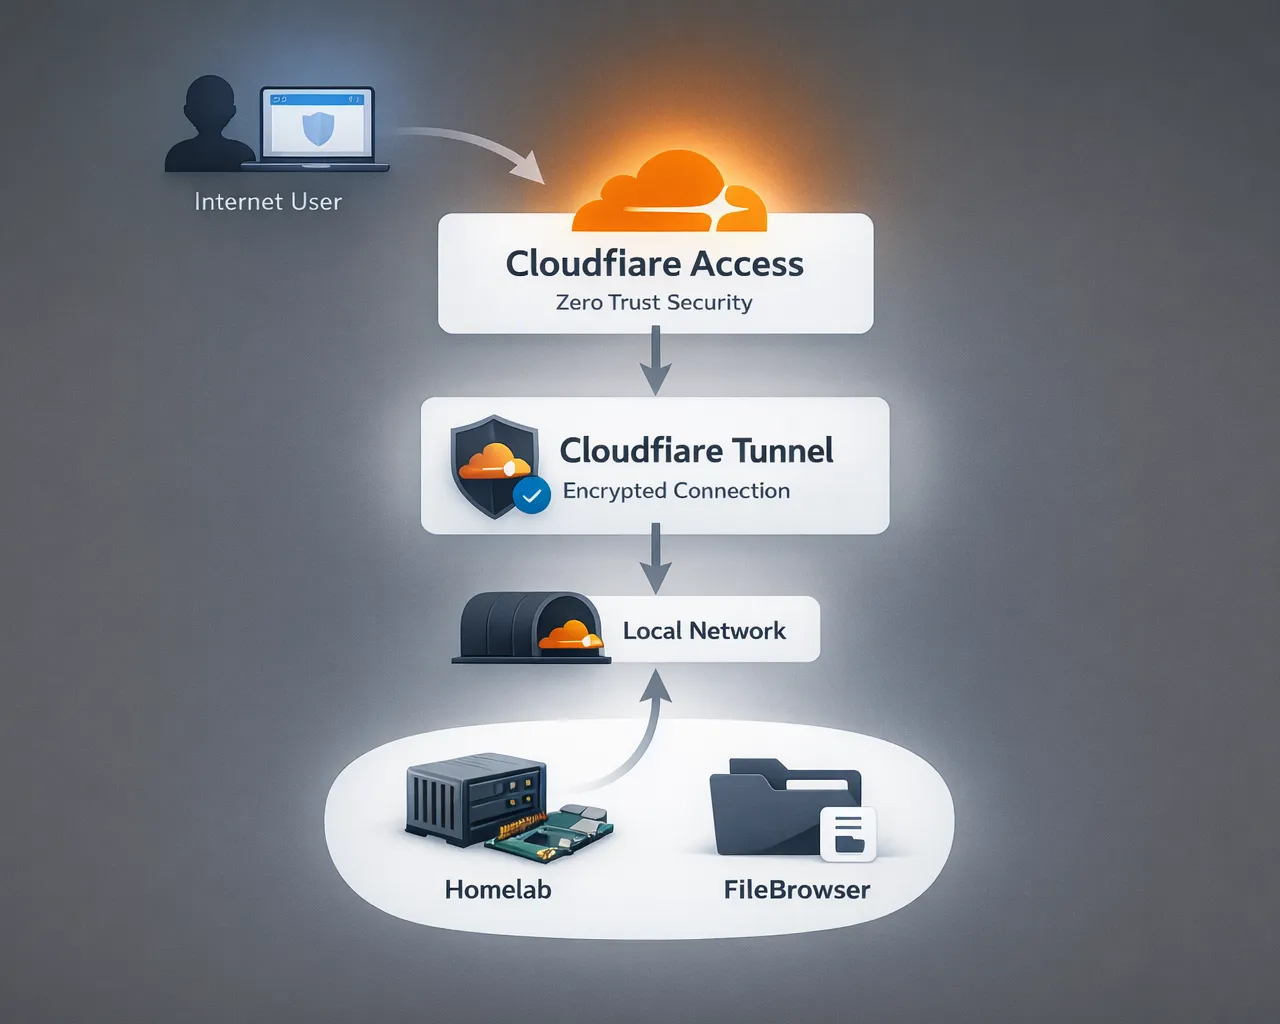
Key concepts#
-
Cloudflare Tunnel (cloudflared): a lightweight daemon that creates outbound-only connections from your host to Cloudflare’s edge. Removes need for public IP or open inbound ports on your homelab.
-
Cloudflare DNS / Nameservers: Full Setup means Cloudflare manages DNS for your zone (recommended for simplest Tunnel integration). Partial/CNAME setups are possible but limit automation and some features.
-
Cloudflare Access (Zero Trust): enforces identity and policy checks at Cloudflare’s edge before allowing requests to reach your origin. Policies are rule-based (allow/deny/actions).
-
Identity Provider (Google OAuth): Cloudflare integrates with Google Identity (standard OAuth/OIDC flow). Users authenticate with Google; Access applies policies (e.g., allow
*@yourdomain.comor specific accounts).
Minimal, high-level deployment flow#
Present these as short steps; link to detailed appendix for commands.
- Add domain to Cloudflare : register the zone in your Cloudflare account and choose Full Setup (Cloudflare will provide nameservers).
- Update nameservers at your registrar : replace registrar nameservers with Cloudflare’s assigned nameservers (verify propagation).
- Create a Cloudflare Tunnel : create the Tunnel in the Cloudflare dashboard and install
cloudflaredon the FileBrowser host. Configure the tunnel to route your subdomain (e.g.,files.shubhamranpise.com) to FileBrowser’s local port. - Configure DNS record for the subdomain : point the subdomain to the Tunnel (Cloudflare can auto-create this when using Full Setup).
- Enable Cloudflare Access for the application : create an Access application for the subdomain and attach policies.
- Add Google as an Identity Provider : in Cloudflare One Integrations, add Google (or Google Workspace) with Client ID/Secret; choose the appropriate scope and any PKCE options if needed.
- Create Access policy rules : e.g., require Google login and limit access to specific emails or groups; test login flow.
References (official docs)#
- Cloudflare Tunnel overview & setup — https://developers.cloudflare.com/cloudflare-one/networks/connectors/cloudflare-tunnel/ ↗
- Quick setup & Tunnel creation — https://developers.cloudflare.com/tunnel/setup/ ↗
- Change your nameservers / Full Setup — https://developers.cloudflare.com/dns/zone-setups/full-setup/setup/ ↗
- Cloudflare Access (Policies overview) — https://developers.cloudflare.com/cloudflare-one/access-controls/policies/ ↗
- Google identity provider integration — https://developers.cloudflare.com/cloudflare-one/integrations/identity-providers/google/ ↗
- Tunnel FAQ and Partial vs Full setup notes — https://developers.cloudflare.com/cloudflare-one/faq/cloudflare-tunnels-faq/ ↗
This setup allows FileBrowser to be securely published to the internet without exposing your homelab directly, while Cloudflare Access ensures only authenticated users can reach the service.